
Contactless payments on Android phones offer convenience and security, but NFC issues can sometimes complicate the setup process. Whether you’re new to mobile payments or experiencing frustrating connectivity problems, this comprehensive guide will walk you through setting up contactless payments and troubleshooting common NFC issues.
With the increasing adoption of tap-to-pay technology, ensuring your Android device is properly configured for contactless payments has become essential. We’ll cover everything from checking NFC compatibility to resolving connectivity problems, ensuring you can make seamless payments wherever contactless payment is accepted.
Table of Contents
Requirements
- Android phone with NFC capability (most phones released after 2015)
- Google Wallet or other compatible payment app installed
- Debit or credit card from a participating bank
- Secure screen lock (PIN, pattern, password, or biometric)
- Internet connection for initial setup and card verification
Step-by-Step Setup
Step 1: Check NFC Compatibility
Before setting up contactless payments, verify that your Android phone has NFC capability. Most Android phones released after 2015 include NFC, but some budget models may not. To check, go to Settings > Connected devices > Connection preferences > NFC. If you don’t see this option, your phone may not support NFC.
If your phone doesn’t have built-in NFC, you may be able to use external NFC stickers or cases that add this functionality. However, for the best experience, using a phone with built-in NFC is recommended. Once confirmed, ensure NFC is enabled by toggling the switch in the NFC settings.
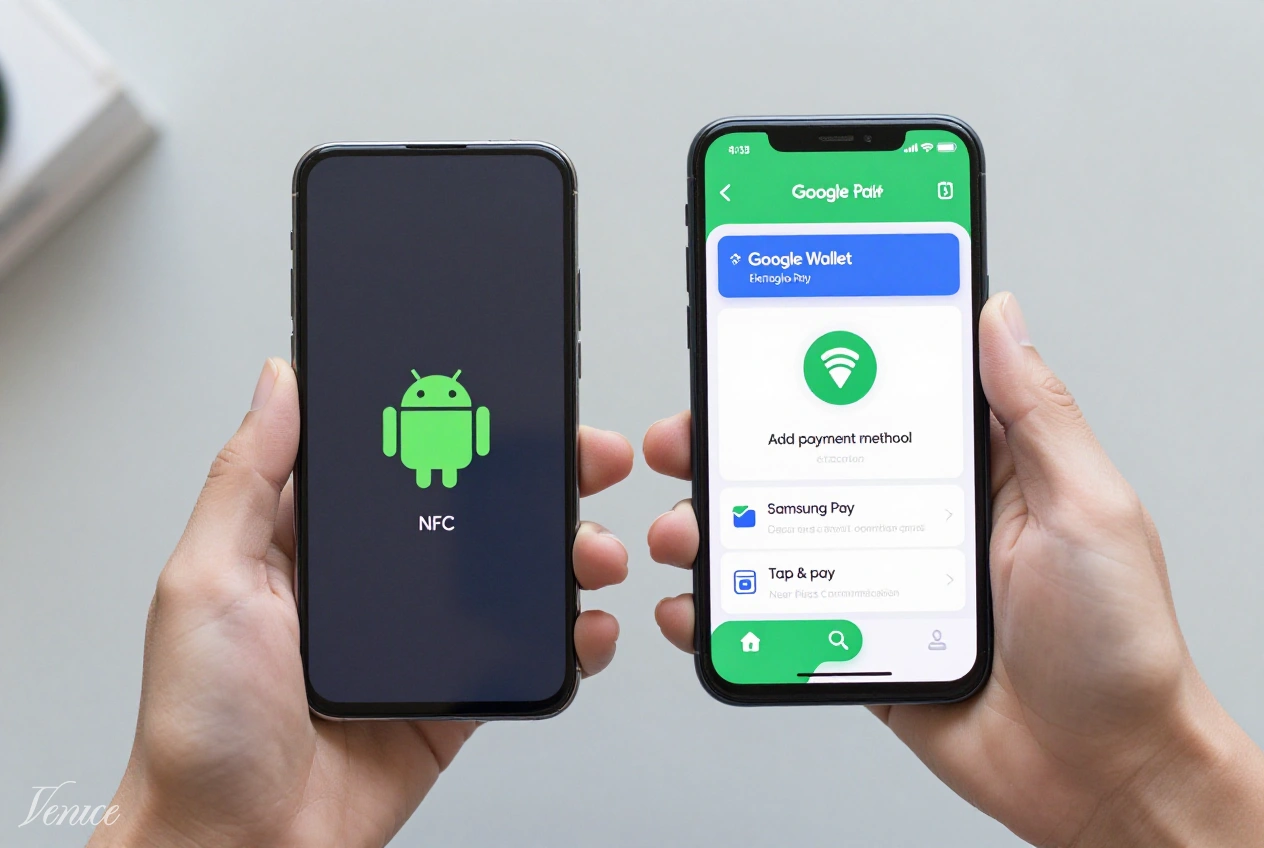
Step 2: Install Google Wallet or Payment App
Google Wallet (formerly Google Pay) is the default payment app for most Android devices, but some manufacturers may include their own payment apps. If Google Wallet isn’t pre-installed, download it from the Google Play Store. For Samsung devices, you might use Samsung Pay instead, which offers similar functionality.
Open the payment app and complete the initial setup process, which may require agreeing to terms of service and granting necessary permissions. These permissions typically include access to NFC, location services (for some features), and the ability to run in the background.
Step 3: Add Your Payment Cards
With the payment app installed, it’s time to add your payment cards. Tap the “Add payment method” option in the app and choose whether to add a credit or debit card. You can add cards by either manually entering the card details or using your phone’s camera to scan the card.
After entering your card information, you’ll need to verify the card with your bank. This typically involves receiving a verification code via SMS or email and entering it in the app. Some banks may require additional verification through their mobile app or a phone call. Once verified, your card will be added to your digital wallet.
Step 4: Set Default Payment Card
If you’ve added multiple cards, you’ll want to set a default payment card for quick access. In the payment app, you can usually long-press on a card and select “Set as default card” or access this option through the card’s settings menu. This card will automatically appear when you tap to pay at terminals.
You can change your default card at any time, and you can also manually select a different card during the payment process by opening the payment app before tapping your phone on the payment terminal.
Step 5: Configure Payment Settings
Customize your payment settings according to your preferences. In the payment app’s settings, you can configure options like card verification methods, transaction notifications, and what happens when your phone’s battery is low. Some apps also offer additional security features like requiring verification for every transaction above a certain amount.
Ensure that your phone’s screen lock is properly configured, as most payment apps require a secure lock screen for security purposes. You can typically choose between PIN, pattern, password, or biometric authentication (fingerprint or face unlock) for verifying payments.
Step 6: Test Contactless Payment
Before using your contactless payment in a real transaction, test it to ensure everything is working correctly. Look for a store with a contactless payment terminal that displays the contactless payment symbol (four curved lines resembling a Wi-Fi symbol rotated 90 degrees).
To make a payment, unlock your phone and hold it near the payment terminal with the screen facing up. You don’t need to open the payment app unless you want to select a specific card. Your phone should vibrate or make a sound when the payment is processed. If the test is successful, you’re ready to use contactless payments anywhere they’re accepted.
Troubleshooting Tips
If you encounter issues with contactless payments, try these troubleshooting solutions:
- Ensure NFC is enabled in your phone’s settings and that your phone’s software is up to date
- Remove and re-add problematic cards in your payment app to resolve verification issues
- Check that your phone case isn’t interfering with NFC connectivity – try removing it temporarily
- Restart your phone if contactless payments suddenly stop working
- Clear the cache of your payment app if it’s not responding or crashing
For persistent NFC issues, check if your phone’s NFC antenna is located in an unusual position. Some phones have NFC antennas in specific areas (like the upper back), so you may need to adjust how you hold your phone at payment terminals. You can usually find this information in your phone’s user manual or online support resources.
If your bank card isn’t being accepted, contact your bank to ensure they support mobile payments and that your account is properly configured. Some banks require you to enable mobile payments through their online banking portal or mobile app before you can add the card to Google Wallet.
Frequently Asked Questions
If NFC is enabled but contactless payments aren’t working, several issues could be at play. First, ensure you have a payment card set up in your payment app and that it’s properly verified. Check that your phone’s screen lock is enabled, as most payment apps require this for security. Also, make sure you’re holding your phone correctly against the payment terminal – the NFC antenna is usually located on the back of the phone, but its exact position varies by model.
Most Android phones require some battery power to process contactless payments, but some phones have reserve power specifically for this purpose. Google Wallet on many Android devices can still make a few contactless payments even when the battery is critically low, though this feature varies by manufacturer. For reliable payments, ensure your phone has sufficient battery before attempting transactions.
Contactless payments on Android are generally very secure. They use tokenization technology that replaces your actual card details with a unique digital token for each transaction. Additionally, most payment apps require authentication (like your fingerprint or PIN) before processing payments. Your actual card information is never shared with merchants, and if your phone is lost or stolen, you can remotely disable payment features through Android Device Manager or your payment app’s website.
Some payment terminals may have difficulty recognizing certain Android phones due to variations in NFC technology implementation. Try holding your phone in different positions against the terminal – some phones work better when held horizontally rather than vertically. If you consistently have issues at a particular store, it might be a problem with their terminal rather than your phone. Additionally, ensure that the contactless payment symbol is displayed on the terminal, as not all card readers support contactless payments.
Yes, you can typically use contactless payments internationally wherever contactless payment is accepted, as long as your cards support international transactions. However, be aware that some payment apps may require an internet connection to verify cards when traveling abroad. It’s a good idea to set up your payments and verify your cards before traveling internationally. Also, inform your bank about your travel plans to avoid your cards being blocked for suspicious activity.
If a contactless payment is declined, first check if you have sufficient funds or available credit on the selected card. If that’s not the issue, try selecting a different payment method in your app or use the physical card instead. Sometimes payment terminals have technical issues, so trying again or using a different terminal might resolve the problem. If the issue persists, contact your bank to ensure there are no holds on your account and that mobile payments are enabled for your card.
Conclusion
Setting up contactless payments on Android phones is a straightforward process that can greatly enhance your shopping experience. By following the steps outlined in this guide and troubleshooting any NFC issues that arise, you’ll be able to enjoy the convenience of tap-to-pay technology wherever you go.
Remember that contactless payment technology continues to evolve, with new features and security enhancements being introduced regularly. Keep your phone’s software updated and stay informed about the latest developments in mobile payment technology to ensure you’re getting the most out of your Android device’s payment capabilities.
With proper setup and maintenance, contactless payments on your Android phone can provide a secure, convenient, and efficient way to make transactions without the need for physical cards or cash, streamlining your financial interactions in an increasingly digital world.